Quick Start Guide
This guide will help you get up and running with TeXRA quickly. In just a few minutes, you'll be able to use AI to enhance your academic research in VS Code.
Overview
TeXRA integrates powerful AI capabilities directly into your writing workflow. Here's what you can do:
- Fix grammar and typos in academic documents
- Improve writing style and clarity
- Create or enhance technical figures
- Transform papers into different formats (lecture notes, slides, posters)
💡 Tip: Inside VS Code you can open the Run your first TeXRA workflow walkthrough from the Get Started page (or by running
TeXRA: Open Getting Started Walkthrough). It mirrors this guide step-by-step and links directly to the relevant commands.
Set Up API Keys
Before you can use TeXRA's AI features, you need to provide API keys for the services you intend to use (like Anthropic, OpenAI, Google, etc.). TeXRA stores these keys securely using VS Code's secret storage.
- Open the Command Palette: Press
Ctrl+Shift+P(orCmd+Shift+Pon macOS). - Run the Set API Key command: Type
TeXRA: Set API Keyand select the command. - Follow the prompts: Select the API provider (e.g., Anthropic, OpenAI) and enter your key when prompted.
Repeat this process for each AI provider you plan to use with TeXRA.
You can also place a .env file in your workspace with variables like OPENAI_API_KEY. TeXRA loads this automatically so you don't need to enter keys every time.
Basic Workflow
The typical TeXRA workflow consists of these steps:
- Select files to process (input, reference, auxiliary, figures)
- Choose the appropriate agent (correct, polish, draw, etc.)
- Select the AI model to use
- Provide specific instructions
- Execute the agent
- Review the generated output
Your First TeXRA Task
Let's go through an example to illustrate the basic workflow.
Step 1: Open a Document
- Open VS Code
- Navigate to the TeXRA panel in the sidebar (click the brain icon) or press
Ctrl+Alt+M(Cmd+Option+Mon macOS) - Open or create a LaTeX document from the workspace you'd like to improve
Example
Run TeXRA: Create Sample Project from the Command Palette to add a ready-made example to your workspace. This creates a draft.tex file under texra-sample/. Open it, run TeXRA: Set API Key to add your credentials, then select an agent and model in the TeXRA panel. Finally, write your instruction and execute the agent to see results.
Step 2: Select Files
- In the TeXRA panel, click the "Current" button next to "Input" to set your active document as the input file
- (Optional) Add reference, auxiliary, or figure files if needed for your task
Onboarding Prompt
The first time you choose an input file, TeXRA shows a tooltip explaining the selector. Select Never remind again to hide it permanently.
Multiple Files
For complex documents with multiple input files, use the "Multiple" dropdown to select additional files.
Step 3: Choose Agent and Model
- In the dropdown menus at the bottom of the instruction box, select:
- Agent:
polish(for improving writing) - Model:
sonnet45(Claude Sonnet 4.5) or another available model
- Agent:
Onboarding Prompt
When you first open the agent or model dropdown, a tooltip explains its role. You can dismiss these prompts with Never remind again.

Step 4: Write Instructions
In the instruction text area, provide specific guidance for the AI. For example:
Improve the clarity and flow of this document. Focus on making the technical
explanations more accessible. Fix any grammatical issues or awkward phrasing.
Ensure consistent terminology throughout.
Effective Instructions
Be specific about what you want! Vague instructions are like asking a genie for "something cool" – results may vary wildly. Include what should change and what should remain the same.
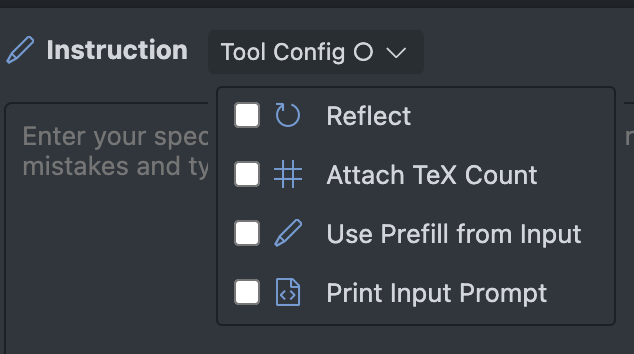
Step 5: Configure Tools
- Click on the "Tool Config" dropdown
- (Optional) Enable helpers for this run:
- "Attach TeX Count" to include document statistics
- "Attach Diagnostics" to include LaTeX compilation logs and other troubleshooting details
- Reflection rounds are controlled by the selected agent—most writing agents already include a follow-up critique pass
Save Prompts for Later
Enable the texra.debug.saveInputPrompt setting if you want TeXRA to store the generated prompt alongside other debug artifacts.

Step 6: Execute the Agent
- Click the "Execute" button ()
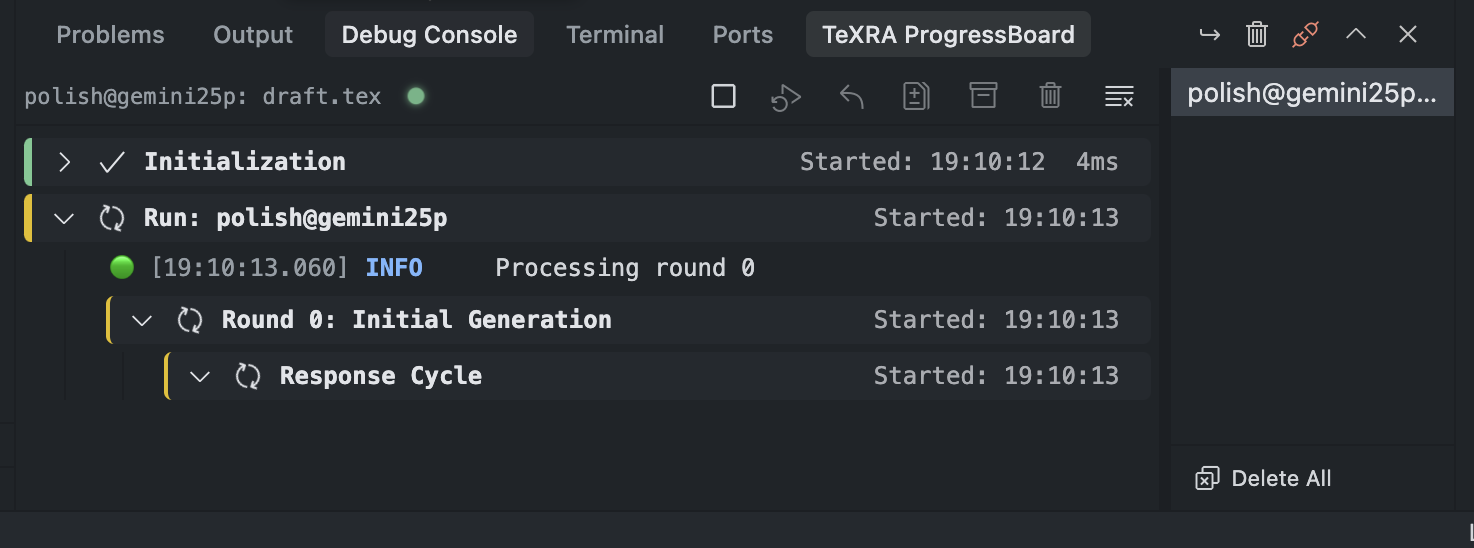
- The ProgressBoard panel (typically at the bottom) will show the progress. See the ProgressBoard guide for more details on interpreting the logs.
- Wait for the process to complete - this may take a few moments depending on the document size and model choice

Step 7: Review Results
- When the agent completes, VS Code will open the generated output file (e.g.,
yourfile_polish_r0_model.tex). - Review the changes made by the AI. Remember, it's smart, but hasn't passed its quals yet!
- You can compare the original and modified versions using:
VS Code's Diff View: Right-click on the original and output files in the Explorer and select "Compare Selected" for a side-by-side source code comparison.

You can accept individual changes by clicking the arrow icons that appear between the two panels. The left arrow () restores the original text, while the right arrow () accepts the AI's changes. This makes it easy to cherry-pick which modifications you want to keep.
TeXRA's LaTeXdiff feature: Use the LaTeXdiffs section in the TeXRA panel for a compiled, visual comparison. This creates a PDF with additions highlighted in blue and deletions in red.
For details on how LaTeX diff works, see the LaTeX Diff guide.
Common Quick Tasks
Here are some common tasks you can try with TeXRA:
Fixing Grammar and Typos
- Agent:
correct - Model:
gemini25p,gpt41,gpt51,gpt5, orgpt5pro - Instruction: "Fix grammatical errors and typos without changing the content or technical terminology."
Converting a Paper to Slides
- Agent:
paper2slide - Model:
sonnet45T,gpt51,gpt5, orgpt5pro - Instruction: "Convert this paper into presentation slides using the beamer template. Create approximately 12-15 slides highlighting the key points, methodology, and results."
Improving Writing Style
- Agent:
polish - Model:
opus45orsonnet45T - Instruction: "Improve the writing style to make it more engaging and clear. Enhance the flow between paragraphs while preserving all technical content."
Understanding the Output
When TeXRA completes a task, it produces:
- Output File: The main result with the requested changes
- Log Files: Detailed information about the process
- Diff Files: Visual comparison between original and modified versions (if applicable)
Output files are saved in the same directory as your input file with a naming pattern: original_filename_agent_r0_model.extension
For example, if your input file is paper.tex and you used the polish agent with sonnet45 model, the output file would be named: paper_polish_r0_sonnet45.tex
Next Steps
Now that you've completed your first task with TeXRA, you can:
- Explore more built-in agents for specialized tasks
- Learn about LaTeX diff for comparing document versions
- Discover how to use intelligent merge for combining changes
- Optimize your workflow with custom configuration
For any issues or questions, refer to the troubleshooting section or check the GitHub repository.